DIY Floating Bookshelf: Scalloped Bookshelves
Make this simple diy bookshelf idea using scalloped trim
Has anyone else noticed that scalloped trim has been popping up everywhere?
It is an architectural detail that has been around for forever but has been really popular lately.
Something about a scalloped edge gives me all the vintage character feels.
That is why when it came time to build our toddlers reading nook I knew I wanted to add scalloped bookshelves.
This entire bunk room/playroom has a vintage hunt club feel and scalloped bookshelves felt like the perfect fit.
I don’t know if you have searched for store bought scalloped shelves but they can be pretty pricey…
So I decided to DIY my own floating bookshelves for a quarter of the cost!
Some affiliate links have been provided for your convince, see our privacy policies here
DIY Scalloped Shelf
Scalloped Bookshelf Supplies:
- –Scalloped Trim
- -1×4 Pine Boards
- -Adhesive + Finishing Nails
- -Stain or Paint
The bunk bed room and Eli’s bedroom have the sweetest little dog house bump outs.

It is a small space but it makes for the perfect little reading nook in both rooms.
We tackled Eli’s room’s reading nook when we renovated his bedroom a couple of years ago.

The shelves we made for that space were super simple and we used the same method to DIY these Pottery Barn inspired photo ledge shelves in our living room.
So when it came time to tackle this reading nook, I knew I wanted to create more floating bookshelves but with a bit more character.
Deciding Floating Bookshelf Size
Start by deciding how long you want the floating bookshelves to be.
You could definitely use a router or jigsaw and cut out your own scalloped trim but sometimes the easiest way is the best way.
Hence the reason we used these beautiful scalloped trim pieces from Home Depot.

Our bookshelves will be 4′ long because that allows me to use one piece of scalloped trim per 2 shelves (and that size fits the small wall nicely).
Now cut the scalloped trim to the size you want the bookshelves to be.
Next cut (2) 1×4 pine boards down to the total bookshelf size minus 3/4″, this will account for the space needed on both ends to add small scalloped trim pieces.

After all the bookshelf pieces were cut I sanded them down with 220 grit sandpaper and stained them with Hickory Gel stain.
Assembling the diy Shelving Unit
Now it’s time to start assembling the diy shelving units.
Each shelving unit will consist of (1) scalloped trim piece, (2) 1×4 boards, & (2) small scalloped trim pieces I cut later.

Start by adding adhesive to the edge of one of the 1×4 boards and attaching it to the front of the second 1×4 board.

Use clamps to secure the two pieces together, the wall shelf will look like an L from the side.

Once the glue had a minute to set I added extra reinforcement with finishing nails.
After those two shelf pieces are secure, add adhesive to the front 2×4 edge and attach the scalloped trim.

Secure the scalloped trim with clamps and finishing nails.
After the front scalloped trim piece is on you can measure the sides and cut the small scalloped side pieces.

Attach the side pieces the same way using adhesive and nails.
Finishing Scalloped Bookshelves
Now that the scalloped bookshelves are assembled it’s time for the finishing touches.
I filled the nail holes with color matched putty and gave the entire unit one final coat of stain.

After the stain dried I applied a layer of clear wax, the finish looks so pretty once it’s dry.
You could also paint the scalloped bookshelves instead of staining but I thought the dark stain would contrast the blue beadboard nicely.
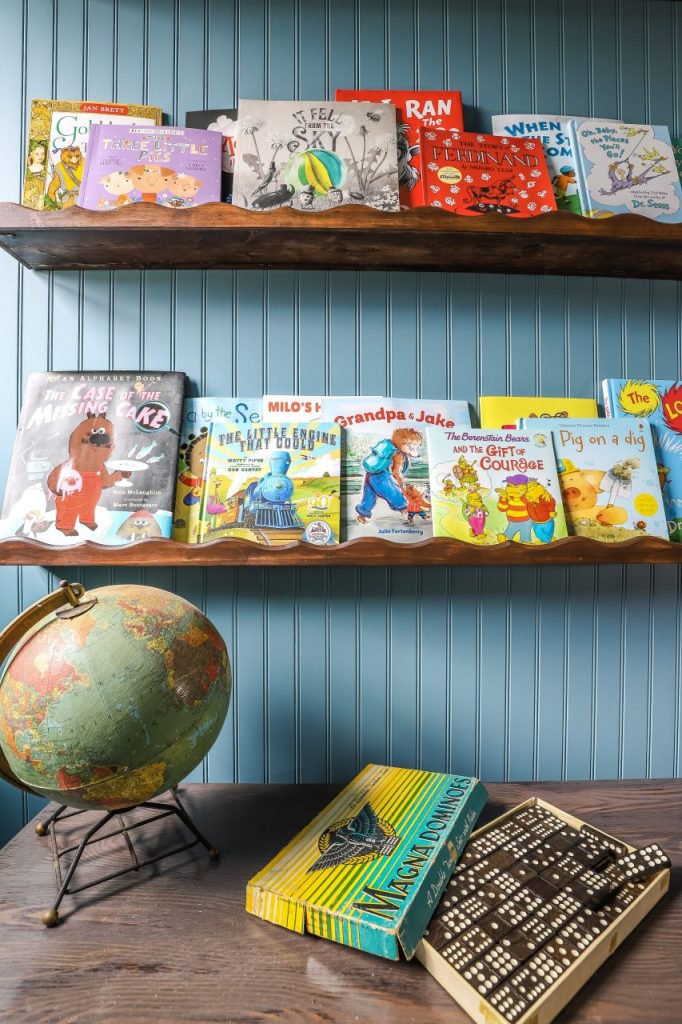
DIY Floating Bookshelf: Scalloped Bookshelves Reveal
To attach the bookshelves to the wall I screwed 2″ wood screws through the back 1×4 piece into studs.
This is the easiest method because you can simply fill the screw holes with color matched putty or leave them unfilled because books will be covering them anyways.

How sweet are these scalloped bookshelves!
The scalloped edge added so much character and charm to this bookshelf wall.

Plus hanging the bookshelves instead of having a floor unit freed up enough space to add this cute vintage chest from Adam’s grandma.
I may add some cushions to it so that it serves as a cozy spot to read in.

Now that this small reading nook is complete I can move onto the other projects and get this bunkbed/playroom wrapped up!
Let me know what you think of this easy shelf diy and if you think I made the right stain color choice.
Want More diy Bookshelf Ideas
How to Build Long DIY Floating Shelves (the Easy Way)
DIY Pottery Barn Inspired Photo Ledge Shelves
How To Build Arched Bookcases The Easy Way
How To Build DIY Pantry Cabinets: Part 1
Related
Credit : Source Post


